An aspirator, also known as a suction machine, is a specific type of medical device generally used to clear obstructions, such as respiratory secretions (mucus and/or saliva), vomiting, blood, or foreign substances, from the patient’s airway, including the lungs and/or windpipe. Suction machines assist in breathing by maintaining a clear airway when a person is unable to expel secretions due to unconsciousness or during ongoing medical procedures. Additionally, surgeons can use it on other parts of the body to remove blood, allowing them to view and operate during surgeries [1]. The emergency care research institute (ECRI) number for the suction machine is 15051 [2].
There are many companies that manufacture suction machines. The following are some of the companies that are in the market [3]:
The machine is used by trained healthcare providers, including doctors, nurses, and pre-hospital providers. Moreover, patients could acquire the machine, according to their condition, after training one of their family members. [1]
The suction machine can be found in the pre-hospital settings as well as the in-hospital settings, including the following: [1]
However, certain portable suction machine types are obtained by patients at their homes [1].
The suction machine is classified under class II as it has a medium to high risk to the patient [4]. Based on the IEC 60601-1 standard, suction machines are typically categorized as Type B since it provides a particular degree of protection against electric shock (earth referenced) and have no direct connection to the patient. [5][6]
Although the machine’s design differs among manufacturing companies, all designs consist of main parts shared by different manufacturers as the following: [7]

Figure 1. A suction machine manufactured by Medela Healthcare company. [8]
Installation
To prepare the suction machine before utilizing it, carefully examine its exterior and confirm the presence of all listed components from the manufacturer in proper condition. Additionally, conduct a thorough inspection of the following: [9]
Though the machine could differ regarding each company, the core components are the same as listed below: [1, 8]
The figure below illustrates the main components of a suction machine.

Figure 2. Components of a suction machine, model super vega suction aspirator, from Gruppo Industriale Milanese Aghi ( GIMA) [8]
Principle of operation
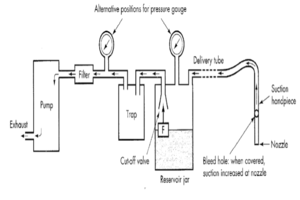
Suction machines pull and remove fluids by generating negative pressure using a Suction/vacuum pump, as shown in Figure 3. That negative pressure creates a vacuum effect that drags the secretions out of the body to the canister. The user can control the negative pressure (suctioning force) using the vacuum regulator knob.[1] Figure 4 below shows a sketch that describes the suction machine operation process.

Figure 3. Vacuum pump of a suction machine model VP35, from Eschmann. [9]

Figure 4. Suction machine principle of operation.[10]
It is necessary to test the suction machine daily, weekly, and every six months based on the manufacturer recommendation to ensure safety, maintain high work efficiency, and avoid device failure in case of occlusion or leakage. [11, 12] The suction machine testing procedures do not require any test equipment, as it is illustrated below:
The daily check-up: [11]
It is worth mentioning that the weekly inspection may or may not be Performed (it depends on the rules followed by the end-user regarding the use of medical equipment). However, it could be done by conducting the following [11]:
Battery inspection: [12]
1- Ensure the functionality of the power cord.
2- Turn on the unit from its internal DC battery instead of using the power cord.
3- Run the DC power for 15 minutes to check the battery condition. Note the following cases during running the DC power:
device off, and reconnect the power cord to charge the device.
Vacuum inspection: [12][13]
Close the patient tube and set the vacuum regulator to the maximum vacuum setting.
Note: After checking the vacuum regulator, un-occlude the patient’s tubing. If there is a leakage in the vacuum pressure, inspect the filter following the steps below: [14]
Table 1. Acceptable vacuum readings. [14]
|
Low vacuum |
High vacuum |
Medium vacuum |
|
Vario 8 c/i – 3kPa |
Vario 18 – 10kPa |
Vario 18c/i – 10kPa |
Monthly maintenance shall be done every six months .[11] Using the device less frequently increases the importance of monthly inspections. The monthly check includes daily and weekly inspections, in addition to the instructions below, to ensure the proper performance of the device. Figure 5 illustrates the testing steps.[13]
Testing steps: [13]
Although the method of setting the test mode could differ between each company, the testing method is mostly the same, as it’s listed below:
The results will indicate the functionality of the machine. Start a pump system test, vacuum tube test, and patient tubing inlet test in case of failure, as illustrated below: [13]

Figure 5. Suction machine test steps.[13]
Pump system test:
1- Turn the device on.
2- Remove the vacuum tube.
3- Block the outlet with the thumb.
Vacuum tube test
1- reconnect the vacuum tube to the device and the canister.
2- Run the test mode while blocking the vacuum tube with the thumb.

Figure 6. Pump system test.[13]
Patient tubing or canister inlet test
1- Run the test mode while blocking the patient tube with the thumb (ensure the tube’s connectivity while testing).

Figure 7. Vacuum tube test.[13]

Figure 8. Patient tubing test.[13]
It is worth mentioning that the daily and weekly inspections should be conducted by the end-user while the monthly PPM is done by the biomedical engineer/ technician.
Despite regular daily and weekly inspections, as well as scheduled preventive maintenance (PPM) every six months, suction machines can still experience functionality problems and failures. Corrective maintenance (CM) is necessary to address these issues. Table 2 outlines common suction machine problems, their potential causes, and recommended solutions.
Table 2. Common suction Machine issues, possible causes, and their solutions.
| Issue | Possible cause | Solution |
| The machine is not operating. | No power | Ø Check if the power switch is on.
Ø Use a DMM (Digital Multimeter) to inspect: Ø The power cords, if so, replace them. Ø The power outlet. Use a battery to power the machine and contact an electrician for rewiring if the power is not present. Ø The battery (in case of using it as the power source), if so, replace/ recharge it.
|
| Fuse blown. | Ø Check the wires or leaks and rectify the cause. Replace the fuse. Test the power before using the machine. | |
| Electrical cable issue | Ø Use another cable to ensure the functionality of the previous one and replace it if it is damaged. | |
| Internal wiring or switch issues | Ø If possible, open the machine and replace the damaged parts or contact the service supplier company. | |
| Low fluid flow, low pressure gauge | Tube /seal / canister leaking or disconnected. | Ø Reconnect them and replace the damaged parts. Then, inspect the change in the pressure gauge reading to ensure that the problem is solved. |
| Tubing system is blocked. | Ø Inspect and clean the blocked parts. | |
| Internal or control error | Ø Contact the service supplier company. | |
| low fluid flow, high pressure gauge | A blocked filter or tube | Ø Disconnect each tube one at a time. When the airflow stops, it means the blockage has been removed. Replace the blocked filter or remove the blockage from the tube. |
| Electrical shocks | Wiring issue | Ø Inspect the source and fix/ replace the damaged part or contact the service supplier company. |
| Manual suction is jammed. | An Internal slider is stuck. | Ø Grease the machine. |
Though the spare parts could differ among companies regarding the design and purpose of the machine, there are essential spare parts each company should provide, as illustrated in the table below. Moreover, the suction machine accessories are mainly the same as its spare parts.
Table 3. suction machine accessories & spare parts with illustrating images.
| Accessories & Spare parts | |
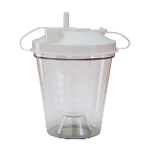
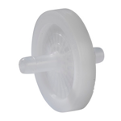
| Canister [13]
|
 |
| Filter [13]
|
 |
| Patient tubing [13]
|
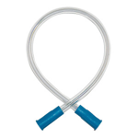 |
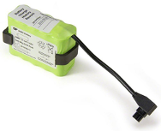
| Batteries [14] | Laerdal rechargeable battery for LCSU4 Suction Units
|
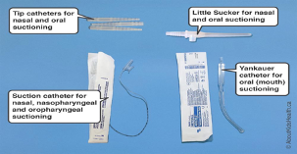
| Suctioning catheter [15]
|
A catheter is a tube attached to the patient’s tubing for suctioning purposes. There are various types of catheters depending on the suctioning method.
|
Service manual
The service manual is conducted by the biomedical engineer/ technician. It assists in illustrating the instructions and steps necessary to maintain and repair the medical equipment. The biomedical engineer/technician’s responsibility is to inspect the suction machine during the scheduled PPM, which is conducted every six months (the duration could differ depending on each manufacturing company). They should follow the operation manual to apply the appropriate steps to maintain the suction machine during its lifespan, as well as how to troubleshoot and repair the issues that could arise while using the equipment, as mentioned previously (under the topics: Test equipment & Periodic Preventive Maintenance (PPM) and Maintenance & Common Problems). [11,12]
Operation manual
The operation manual is used by the end-user. It assists the end-user by illustrating the instructions and steps necessary to use the medical equipment and solves its issues. The end-user should follow the steps below to operate the suction machine: [11,12]
[1]ZOLL Medical Corporation. “What is a Suction Machine?” Zoll.com. [Online]. Available: https://www.zoll.com/resources/what-is-a-suction-machine. [Accessed: Aug. 12, 2022].
[2]ECRI. “ECRI UMDNS Device Term ECRI IMDC ADG Code A Accessories, Endoscopes * ENDOAC Acupuncture Kits Adhesives Enhancers * ADHMED Adhesives,” 1998.
[3]”Surgical suction pump – All medical device manufacturers”, Medicalexpo.com, 2022. [Online]. Available: https://www.medicalexpo.com/medicalmanufacturer/surgical-suction-pump-3744.html.
[4]“Product Classification https://2u.pw/o9kcgePb
[5]Center for Devices and Radiological Health, “Guidance Document for Powered Suction Pump 510(k)s – Guidance for Industry and FDA Reviewers/Staff,” U.S. Food And Drug Administration, Mar. 13, 2018. https://www.fda.gov/regulatory-information/search-fda-guidance-documents/guidance-document-powered-suction-pump-510ks-guidance-industry-and-fda-reviewersstaff
[6]“Introduction to Electrical Safety Testing: Part 2 | Fluke Biomedical.” https://a.flukebiomedical.com/Introduction_to_Electrical_Safety_Testing_-part_2
[7]AboutKidsHealth”, Aboutkidshealth.ca, 2022. [Online]. Available: https://www.aboutkidshealth.ca/article?contentid=3851&language=english. [Accessed: 12- Aug- 2022].
[8]“Dominant Flex and basic surgical suction pumps,” Medela, https://www.medelahealthcare.com/en-US/solutions/professional-vacuum-solutions/surgical-airway-suction/dominant-flex-and-basic-suction-pumps (accessed Apr. 27, 2024).
[9]“Portable Phlegm Suction Unit User’s Manual Please read the user’s manual closely before using!,” Ecemedikal.net. [Online]. Available: https://www.ecemedikal.net/wp-content/uploads/2017/10/SX-1D-users-manual_eng.pdf. [Accessed: 07-Sep-2022].
[10]Skeet,Muriel and David Fear.“Electrical Suction Apparatus.” Care and Safe Use of Medical Equipment. VSO Books, 1995.
[11]Support, S., 2022. Suctioning. [online] Hopkinsmedicine.org. Available at: <https://www.hopkinsmedicine.org/tracheostomy/living/suctioning.html> [Accessed 20 August 2022].
[12]Say, S., 2022. The Routine Maintenance You Should Be Performing on Your Suction Equipment. [online] Blog.sscor.com. Available at: <https://blog.sscor.com/the-routine-maintenance-you-should-be-performing-on-your-suction-equipment> [Accessed 25 August 2022].
[13]“800cc Disposable Suction Canister | Canisters | Suction Accessories | Suction Therapy | Respiratory | Products | Drive Medical US Site,” shop.drivemedical.com. https://shop.drivemedical.com/us/en/products/respiratory/suction-therapy/suction-accessories/canisters/800cc-disposable-suction-canister/p/367-1 (accessed Apr. 26, 2024).
[14]Laerdal Rechargeable Battery for LCSU4 Suction Units,” AED Superstore. [Online]. Available: https://www.aedsuperstore.com/laerdal-medical-rechargeable-battery-12vdc-nimh-lcsu4-suction-unit.html. [Accessed: 07-Sep-2022].
[15]“AboutKidsHealth,” Aboutkidshealth.ca. [Online]. Available: https://www.aboutkidshealth.ca/article?contentid=3852&language=english. [Accessed: 07-Sep-2022].